Join the TSS Yahoo Group!

Sunday, November 14, 2010

Wow!! Something productive! :)

I participated in a Ten Seconds Studio Yahoo Group Holiday Ornament Swap!  Whew!  What a mouthful!! :)  I'm pretty happy with my results!
I used my Sizzix X-mas tree die and cut out 2 chipboard pieces, 1 paper piece, and 1 metal piece.  I embossed the metal, sanded, and then flattened.  I glued everything together, inked the edges w/ Distress Ink, punched a hole for the ribbon, and added some glitter glue and bling! :) 
I hope the recipients enjoy them!! :)


Thursday, September 30, 2010

Oh, Mr. Mojo??!!!! Where are you???

Yes, folks.  It's me!!  I'm still here!  I have been seriously lacking in the "mojo" department.  I just have not been able to create much of anything!!!  The one outlet that I have been enjoying lately is my new Digital Scrapping software.  I have been putting together some fun pages and that has at least allowed me to feel a little creative!
As far as "artwork and crafting", I just don't know where my Mr. Mojo has gone..... :(
I finally made a cute little post it note holder last night.  Maybe my Mojo is going to show back up again.  :)

Here are a few of my digi scrapping pages...... and my cute little Post It Note Holder at the end of the post.   The software I'm using for the scrapping is called My Memories Suite 2.  Super easy and fun to use! :)


Here is my Post It Note Holder.  I found a few fun tutorials online.  This one is a little too big for the pad, but I found another tutorial w/ smaller dimensions.  I used up some scraps that I had and I think it turned out cute! :)


Off to make a couple more quickie Post It Note holders.  Hopefully Mr. M will come roaring back home soon!! :)
xoxoxoxoxoxooxoxoxo

Wednesday, July 14, 2010

My Last 2 Fair Entries! :) We are off to turn them all in today!

Here we are!!  My last 2 entries for this year's Fair.  You have already seen this piece.  I did add more color to the UTEE pieces and I changed the picture display.  (I don't really like to display the kid's pictures in such a public venue)  Plus, I always get such a kick out of this image!  Isn't she great?!!! :)  Of course, I sealed the piece with PYMII.  If you'd like to read my process for making the mosaic pieces, you can see my blog post here:  "Mosaic Frame"


===========================

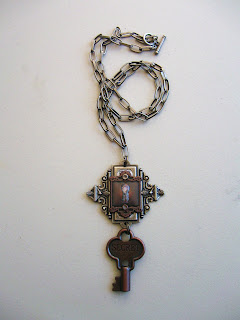
My final piece is a "Secret Necklace".  My art is usually "lost" on most of the fair judges.  They just don't get me.  But, I enter stuff anyway.  :)  This is modeled from a piece I made in a class I took with Tim Holtz.  It's all Ideaology goodies, Distress Stickles, and Glossy Accents.  You have to look really hard, but you can see the "secret" through the keyhole.  :)

(click any picture for a closer look)

It is a little easier to see in person.  It just doesn't photograph that well.
Anywho, thanks for looking!!  We are off to turn stuff in.  Our fair runs the last week of July and the first week of August.  I'll let you know how we do after we attend the fair on the first day!
Hey, I'm just happy to have the free entry tickets!! :)
Toodles!!

Tuesday, July 13, 2010

More Fair Projects...... Kid's Turn! :)

Hi Again!!
Here are the kid's entries for this year. 
========================

My daughter, Rebecca,  wrote 2 poems and made one Mixed Media Drawing.  The Retainer poem was actually done for her English class.  They had to write an insult poem using some medieval language.  It was written about 2 weeks after she accidentally tossed her retainer into a Costco trash can...........never to be seen again!

(click for a larger view)


This poem was written this summer.  I really like this one.... great message!!

(click for a larger view)


This is her Mixed Media drawing.  Pencil and Felt Pen.  Slightly "Zentangle-like"

==============================

Here are Kyle's entries! 

First up, the Andean Condor!  Clothes hanger, duct tape, foil, feathers, and paint!  :)
(oh, and a plastic margarita glass for a stand)


A Wilbur drawing done in class this year... check out Charlotte in the corner! :)


No fair is complete without some Legos!!  "Freestyle under 200 Pieces".  Some sort of Jet Tank with Escape Pods (as it was explained to me)


And, the mother of all Solar System projects.  Another entry courtesy of 3rd grade curriculum!  Hey!  We know when to double dip!! :)  Yes, we included Pluto!

So, they are all tagged and ready to drop off tomorrow.  It really is great because all of the kids that enter "stuff" in the fair are guaranteed at least a 3rd Place Ribbon.  The kids look forward to seeing all of their creations displayed at the Fair!!  Lots of Kodak moments modeling in front of their entries and ribbons! :)Every kid (and adult) also gets a free entry ticket into the Fair. 

Tomorrow I'll post my last 2 entries.  One is still drying!  LOL!!!!!!!
Toodles...........

2 Sonoma County Fair Entries

It's Sonoma County Fair time again!! :)  The kids and I have been entering "stuff" in the fair for several years now.  We are putting the finishing touches on our entries.  This kid's stuff is almost ready.  My stuff???.......  I am blowing on my glue and trying to make it dry before we have to turn stuff in tomorrow!  LOL
==========================

Here are 2 of my projects.  First, a copper leaf "sculpture".  I stamped the copper with real grape leaves. (used black acrylic paint)   I cut out the leaves by hand.  I used the Ten Seconds Studio Salt and Vinegar Chips Patina method.  Then I ran all of the leaves through my Big Shot with a different Tim Holtz Texture Fade folder.  I did a little sanding.......... sealed with PYMII......... 
Then I glued all 4 leaves onto a grape branch. (the branch has been treated with 2 coats of glossy wood sealer)
and......... voila!
Copper Sculpture! ;)
===============================

(you can click on picture for a close up)


Close up of Leaf 1


Close up of Leaf 2


Close up of Leaf 3


Close up of Leaf 4


My second entry this year is a UTEE/Idea-ology Magnet.  I used a UTEE piece that I made a long time ago and added some Tim Holtz goodies.  :)  A quick and fun piece!!


I have 2 more entries that are still drying!    I'll post pics of those shortly! :)
Toodles for now!


Tuesday, June 29, 2010

Colored Pencils on Metal!!?? Why not!! :)

Yeppers.  Another metal experiment.  I am a little disappointed in the outcome of this experiment. But, I do think with a few adjustments, it can turn out much better.  So........ let me tell you what I did (and show the results) and then I'll tell you what I think it will take to turn out better! :)
-------------------------------------------
First, I have been smitten by the notion of drawing on metal with colored pencils.  I have seen a matte black metal that is designed for drawing.  I have not ordered any of the metal because it is rather expensive.  Then I thought, why not try and make some out of what I have??!! 
-----------------------
I took some of my Rock Star Black metal from Ten Seconds Studio and sprayed 2 medium coats of PYMII on it.  (PYMII is an acrylic sealer.... super fabulous stuff!  Great for sealing all sorts of projects, including metal!!)  This gives the metal some "tooth" to take the colored pencil.

On the top, the PYMII coated metal.  Below (on the scrap piece of metal) colored pencil over untreated metal.


I ran the coated metal through my Big Shot Machine. (used a Cuttlebug folder.... Holly)  You can see (sorta) that I debossed the metal. (i.e. the pattern is sunk in on the front and puffed out in the back)


Then I colored in the debossed areas with colored pencil.  This is what it looks like unaltered after coloring.


This is the effect you can get if you sand the pattern after coloring. (Obviously you need to be a little more careful with your sanding!! :)

So.  Overall, I think the technique has possibilities!!  Now, how to make it better??
-----------
1) Freehand embossing should give better results.  The 90 degree (almost) angle of the Cuttlebug folder image is too sharp.  It is very difficult to color the entire image w/out getting it on the edge of the image.  You could try to use extremely sharp pencils to try and avoid this problem.  So, next time I will try to do a freehand image and I bet the results will "pop" more off the metal.

2) Two additional coats of PYMII should give a more even coloring surface.  I think the pencils will take better with a couple more coats of sealer.  Also, using lighter colors obviously will make the image contrast more w/ the black surface.

3)  Improve my coloring skills!  LOL!!  I think this technique could look really beautiful if colored by someone with a little more talent! :)

4) Just a note.  This technique could also be done with the Brrrrrrr Blue, Dark Chocolate, Barn Red, and Plum metals.  (The darker colors of metal) 
====================


Now, I did try a little somethin' somethin' with a couple of leftover scraps.  I think these would make really cool embellishment pieces!!
-------------------

I took a piece of the coated metal and used my colored pencil to emboss the image (instead of my paper stump) 
Then I sanded the image.  You can see the cool colored bits of metal under the sanded image.  I think it looks pretty nifty!


Here is another example using a very light blue pencil over the coated black metal.  Again, coooooooooooool! :)

So, overall I think my experiment has possibilities! :)   Another medium that could be used:  Chalk pencils! 
Remember that you will have to seal over the colored pencil or chalk after you finish your piece.  You can use the PYMII over non-permanent mediums.

Thursday, June 24, 2010

A Metal Mosaic Experiment

I don't know about you, but I really liked the Mosaic Technique on Taco Tuesday this week. :)  Someone on the TSS Yahoo Group suggested that maybe you could put together the mosaic on top of a piece of Humungo Double Sided Tape FIRST, and then die cut the mosaic. 
 (this was presented by: Lori H aka "llhassle")
-----------------
I thought this was a great idea!!  I gave it a shot!! :)  I decided not to worry about the gaps inbetween the metal pieces.  I filled them with "grout"!
----------------
I took a scrap piece of Humungo Tape about 4x4 inches.  I peeled the backing off and carefully put on top of my craft sheet.  I cut up a bunch of scrap pieces of metal and randomly put them together over the exposed sticky-side of the tape.  After I was done, I cut out 4 flower shapes with my Tim Holtz Alterations Die.  One medium flower and 3 small flowers.  After I cut out the shapes, I filled in the exposed gaps with extra fine glitter. (my grout!)  I stuck one small flower over the medium flower and placed a blingy brad in the center.  I just added the blingy brad to the other small flowers as well.
------------------
I think they turned out pretty cool!  A little funk-i-fied, but cool! :) :)  What do you think??!! 


Wednesday, June 23, 2010

TSS Yahoo Group - Our first SWAP! :) ATCs

Hi!  Well, I have set up our first Swap over at the new Ten Seconds Studio Yahoo Group!!  We are starting "easy" with some ATCs.  I thought I'd share my progress with you as I work through my creations for the swap.
----------------------
One of my most favorite "art things" to do is make backgrounds.  I just love the freedom of abstract art. Slopping around with paints and inks...... doesn't get much better! :)   I came up with an idea to use the TSS molds in my background! (I'm sure many others out there have already done this!:) 
-------------------------
I started with some heavy watercolor paper.  I dabbed some of my Starburst Stains onto several of the TSS molds (can you find them??:)  Then I "stamped" the molds onto the watercolor paper.  There was a lot of puddling and generalized spreading of ink, but you can still make out the basic images of the molds.  After the Starburst Stains dried, I did the same thing again with Distress Inks.  After that layer dried, I then used my Tim Holtz Blending tool to "fill in" the blank spots with more Distress Ink.
You can see the full sheet here:
(You cannot see the shimmer from the Starburst Stains here.... it is really neat because they peek out from behind the Distress ink...pretty!)


--------------------------
After all of the inks dried, I then cut 4 base pieces for my ATCs.  Here they are!! :)


Who knows what the next step will be?!!  That's the fun of it, isn't it??? :)  Stay tuned.........
(p.s. If you'd like to join in on the fun, the sign up deadline for the swap is not until July 9.  Come join the group and play! :)

Wednesday, June 9, 2010

Finished the Embossed Dog and made a Mosaic Frame

Yippie!  I actually finished off the "All Dogs Go To Heaven" project that I started with my metal embossing kit for the Cricut from Chomas Creations.  The girl I made this for is a hippie wannabe, so I made it in sort of a grungy, tie-dye style.  I hope it doesn't make her too sad.......

=======================

I also actually executed a project that I envisioned a while ago!  WooHoo!! :)  I wanted to make a mosaic frame from UTEE and metal.  I thought it would look pretty cool!  I used the Ten Seconds Studio molds for the patterns on the UTEE.  I did a freehand pattern on the metal.  I used Rock Star Black metal and black UTEE.  I cut the UTEE pieces while it was still warm.  I embossed and sanded the metal and then I cut it up into pieces.
========
I took a cheapo square wooden frame that I got from Michael's and covered it with the Humungo 2 sided tape from TSS.  I cut out the hole in the middle and trimmed the sides.  Then I painted the edges.  Now, I SHOULD have painted the frame first......  oh, well.
============
I placed all of the pieces of UTEE and metal on the frame.  After I got it to look the way I wanted, I filled in all of the spaces with microbeads. I highlighted the UTEE pieces with Perfect Pearls.   I touched up around the middle of the frame with some paint.  I put in a photo and VOILA.... my altered item project for our local fair! :) :)

Super fun and pretty darn easy!


Tuesday, May 25, 2010

Is There Such a Thing as Cheating in Art??????

Yippie!!!!  I got to play with my new toy!!  I ordered an Embossing Kit for my Cricut Expression!  I was hopeful that it would work well on the Ten Seconds Studio metal..... I am NOT disappointed!!! :)  I think it turned out great!  I feel like I'm cheating!! LOL!! :)
I ordered it here:  Chomas Creations
-----------------------------------
I know there are those out there that say you can emboss by turning your blade upside down.  But, because I plan on embossing metal A LOT, I wanted a dedicated tool for that purpose.  To me, this is worth the money!  The embossing cartridge is very sturdy and the mat worked great!! 
----------------------- 
Here is my first attempt and I'm very pleased!!!!
I wanted to make a card for my daughter's friend who just had to put her doggie down yesterday.  She was very attached to the poor poochie, so I hope this will remind her that "All Dogs go to Heaven".  (I'll post my final card when I get it done)
-------------------------------

First, I found this cute image online:
Then I converted the image in Inkscape to a file to import into SCAL to cut with my Expression. 
(SCAL is a third party software program you can use with your Cricut to cut out shapes.  You are not longer restricted to images on the cartridges)
----------------------------------


--------------------------------------
I set the program to Multi-Cut 3 times.  I think 2 would have been enough, but 3 certainly did not hurt anything!! :)
-------------------------------

Here is a close up of the back of the metal after the machine got done embossing.

-----------------------------------
Here is what the front looked like after I took it out of the machine.
Notice the roller marks on the image.  These are very superficial and I was able to easily erase them. 


-------------------------------

Here is the image after I refined it.  Terrible pic, but you can see that the roller marks are no where to be seen! :)  


-----------------------------------
Here is the image trimmed and sanded.  I think it turned out cute, don't you??!!  :)


Tellin' ya, loving this gizmo!!!!  I really think I'll be using it A LOT!!
For all you Metal Heads out there, come join our new Yahoo Group!  TenSecondsStudio Yahoo Group
Come play and learn with us!!!!!
C Ya Soon!

Monday, May 24, 2010

Come Join the new Yahoo Group!!! TenSecondsStudio

You like metal??  You love metal embossing??  Are you a fan of Ten Seconds Studio and Taco Tuesday???  Come join the new Yahoo Group!!!  Come share your techniques, experiments,  and projects or just lurk and learn!!
See ya there!:

Wednesday, May 12, 2010

Last Teacher Gift 3rd Grade - Lemons to Lemonade!!

Whew!  Talk about ducking under the wire!  I just found out yesterday that Miss R.'s last day is THIS FRIDAY!!  (Miss R is the student teacher in my son's 3rd grade classroom)  She is fabulous and will make an awesome teacher!!  The kids love her!  I found out that she is a licensed pilot. (Wow!)  So, Amelia Earhart was my inspiration for my final teacher gift of this year. 
--------------------------
I designed my layout and then went to embossing some Ten Second Studios metal (this time Brrrrrrrrrrrr Blue....  I thought it was a good "flying" color)  I traced the bird and did all of the lettering freehand.  The subtle backgrounds are 2 Sizzix texture plates that I have in my stash. :)  I really do love this quote and I think it translates well to both a teacher and a pilot! :) :)
-------------------------
So here is my lemon story.  When I was done embossing, refining, sanding and basically all of the time consuming work, I cut out the design to fit the plaque. 
==============
AAAAAAAAAAARRRRRRRRRRRGHHHHHHHHHHH!!!!
=================
  I could not believe it!  I was so totally OFF it was not funny!  I was close to tears!!!  It looked terrible!  "Suck it up, Susan!!"  Ok.  Regroup.  Deeeeeeeeeep breath. (where did I put that Jack Daniels??....... wait, that won't help [ok, it might have made the cut look straight after a while])  I know!!  Curvy!!  Curvy is good!.  So, enter the "curvy" left-hand side distressed with some acrylic paint.  Whew! 
Lemonade is served!!!!!!!!!!!
----------------------------
Hope you like it Miss R!!!!!
(click on image for a closer look!)

This piece is sealed with PYMII to protect the paint from being worn or scratched off!  Great stuff!!!!!!