Join the TSS Yahoo Group!

Monday, January 29, 2007

Stamping on Sea Glass Technique

Here is the tutorial I have up at the Stamper's Mall Artist's Corner this week. Feel free to ask questions....just email me! :) This is very fun and easy to do!
Stamping on Sea Glass

You can get Sea Glass at craft stores and many “big box” stores such as Wal*Mart and Target.

Choose the piece that you would like to work with. (The creative possibilities are almost endless!) Ink up your stamp with StazOn. (You may use other inks compatible with non-porous surfaces)


Find the smooth side of the glass and press the glass firmly onto the stamp. Lift straight up from the stamp.


Allow to dry. Choose 1-2 colors of acrylic paint you would like to apply to the back of the glass to highlight the stamped image. Mix in a disposable bowl and then apply to the BACK of the stamped glass. (the non inked side) Allow to dry completely!!


You may finish the pieces by edging with Gold Krylon Leafing Pens or other Glass Paint.

Once completely dry, you may use to embellish cards, ATCs, collages, shrines, and other projects. You can also make the pieces into jewelry or magnets. Use your imagination and see what YOU can come up with.


IMAGE CREDITS: (check out these sites for fabulous rubber stamp images!)
Asian Woman: Art by Moonlight
Waltz of the Sirens: Third Coast Rubber Stamps
Musical Score: Rubber Stampede

IDEA GALLERY:

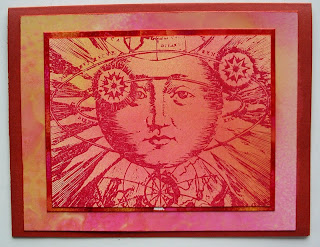
Focal Image with Solid Color behind
(for this particular piece, the paint was applied and then rubbed off in the middle. The image was then stamped behind the "window" of paint. When you flip the piece over, you see the stamped image thru the window and the background paper behind! :)

Focal Image with Patterned Paper behind


Spotlight over Focal Image:

Focal Image over Combination of Papers and Embellishments

Friday, January 26, 2007

Memory Altered Book Spread for Augie and Penny

My FIRST Altered Book spread!!!! Ok......this is more like a scrapbook layout, but since it is made from a board book, that counts as an Altered Book, right?! I started this almost 6 months ago. (right after we lost Penny) I just could not bring myself to finish it until now. I'm glad it's done and now I have a fun memory piece to look at. I'm sure a lot of the ephemera doesn't make sense to you, but everything is significant to my poochies! :)

Thursday, January 25, 2007

Some of my Cards n' Stuff

I started my "deep sea dive" into the paper arts about 2 1/2 years ago. Thought I would post a few cards that I have made over that time. I just love rubber stamps! I'm addicted to collecting them! I need to use them more......they are feeling lonely! :)

Stamp by Toybox Art Stamps. Stamped in Stazon and colored with chalks.

Stamp by Rubber Poet. Homemade backgrounds, stamped in Red Stazon.

Stamp by Stampfrancisco. Alcohol inks on foil tape and bamboo tile.
Fan shaped cards. Decorated w/ various asian stamps and lots of inks! :)


Here is a Memory Frame I made for my Mom for her birthday. I made another one like it for my Aunt (they are twins! :) I used packing tape transfers from photo copies of old family pics. On the little tags are 10 of my Mom's favorite childhood memories. If you enlarge the image, you can see the background is made up of the names of my Mom, Aunt, Grandma, and Grandpa.

Wednesday, January 24, 2007

Paint Scraping Technique-Traci Bautista

Well, I spent some of my Christmas money on Traci Bautista's new book - Collage Unleashed. I really love her carefree attitude and style when it comes to making collage backgrounds. This particular technique is Paint Scraping.
All of these pieces use cheapo watercolor paper from Wal*Mart. These were a ton of fun and I highly recommend the book! If you would like to see directions for this technique, you can see it on the DIY Website/Craft Lab in an episode where Traci demo'd it on the show: Painted Papers: Color Scraping


Here are 2 - 8x10 inch canvas backgrounds I made with the Paint Scraping "leftovers"


UTEE Image Transers

(I just love this piece!! I'm going to use it on a Cowboy spread in that Altered Book that I'm going to start......someday.........soon.........Really!!)While I had my Melting Pot out, I decided to try a few UTEE image transfers. (Suze is having a pendant challenge on her Yahoo Group using this technique) In a nutshell, melt clear UTEE in your pot. Pick out a few magazine or newsprint images you like. Place a metal cookie cutter over the part of the image you want to have transered. (MAKE SURE YOU SMEAR A RELEASE AGENT ON THE INSIDE OF YOUR COOKIE CUTTER!) Pour the melted UTEE slowly into the cookie cutter. Allow to cool. Remove cookie cutter, tear paper around image. Soak in warm water for several minutes and then carefully peel paper off the back of the UTEE piece. DON'T scrub with anything, just use your fingers. When dry, I smeared a coat of Diamond Glaze mixed with Mica Powder over the back of the piece.
I also did a couple of "freeform" pieces. I just poured the UTEE directly over the piece without the cookie cutter. Then I followed the same process as above.

Here is the piece I made into a pendant for the challenge! :)
For more cool UTEE Techniques and information, see Suze Weinberg's Website:
Schmooze With Suze
Look under the "Suze Says" Header at the top!

UTEE/Melting Pot Play!

I had some time to play with my UTEE and Melting Pot last night. I made some pretty cool tags! I used some Laminate sample tags I found in my stash. I melted black UTEE in my pot and then poured onto the tags. Then I stamped into the UTEE with various rubber stamps. I trimmed around the tag to "neaten" it up. I colored the images with Metallic Rub Ons. Final step--I sealed with Krylon Gloss Acrylic Sealer. Now..........what to DO with them???????


Tuesday, January 23, 2007

Air Dry Clay Embellishments

Here is a tutorial I have posted at the Stamper's Mall. These are very fun to do and can really be a great embellishment for a card, altered book, collage, etc etc.
My personal favorite Air Dry Clay is the Paper Clay. VERY easy to work with and super strong and light when dry! Check it out! :)
Stamper's Mall Air Dry Clay Tutorial

Monday, January 22, 2007

Altered Pieces

I also enjoy Altered Art! Here are a few of my attempts!

4 Small wooden boxes altered with UTEE and collage images
Altered clipboard
Shrink Art focal image. Domino canvas.
Altered puzzle piece
UTEE molded focal image.

Collages

I am just beginning to dabble in collage. I really enjoy it and LOVE to make the backgrounds. I'm still working on the arrangement of elements on the pieces.

Here are a couple of my first attempts:


6x8 Canvas


6x8 Canvas

4x4 Chunky Book Page

Monoprinting Technique:

This technique is very easy and creates very interesting background papers.
Start by cutting a page protector on 2 sides. The page protector will now open like a book or magazine. Pounce a well inked Ancient Page Ink. (Archival Inks , Adirondack Inks, and most quick dry dye inks will also work wonderfully for this technique!!) onto one side of the page protector. Close the protector and with your hands gently push the 2 sides together. Open and close the page protector several times. Open a final time and place 2 pieces of 8 ½ x 11 inch paper (glossy or matte) back to back into the page protector. Close the page protector so the 2 pieces of paper are completely covered by the plastic. Place on a flat surface and gently rub the entire surface of the plastic protector to transfer the ink to the paper. Peel off the protector from both pieces of paper. You now have 2 pieces of unique background paper.

Variations: Experiment with different inks: Other brands of dye ink, chalk inks, and distress inks. Use 2 colors of ink at the same time—one color on each side of the page protector.. After your Monoprint has dried, pounce another color over your pattern to create a unique look. After your Monoprint has dried, Monoprint again with a complimentary color. Crinkle the page protector into a ball and open and flatten….then proceed w/ the normal instructions.

Color Wash Background Technique


This technique could NOT be any easier. All you need to do is take a variety of Color Wash Spray colors and spray them liberally onto glossy or matte cardstock. Voila! A gorgeous background piece to work with!


A simple homemade recipe for Color Wash:
Squeeze approximately 30 drops of Stazon Reinker into a small spray bottle. (You can use regular dye ink as an alternative. Stazon inks result in very vibrant colors!)
Slowly add 91% rubbing alcohol to the ink.
Keep testing the color intensity with a small test spray on a scrap of glossy paper
Stop adding the rubbing alcohol when you are satisfied with the color!
Mix your colors to come up with unique blends!