Join the TSS Yahoo Group!

Friday, December 19, 2008

Xmas Project for my Folks! :)

Whew!!!!! I have conceptualized this project since October. But, you know me......... much thought, not a lot of action. (well, creativity-wise) I'm really happy with the result. I started the project once, had to rip everything off and start over.
=======================

So, here it is....... the "COOKIE" project! :) :) :)


====================


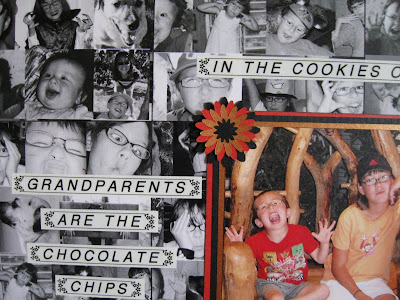
I was thinking that most grandparents get all of the really nice, clean, immaculate pictures of their grandkids. Now, come on people, we all KNOW that isn't the "real" story!! :) I decided to give my parents a "reality" brag book for their wall (well, maybe their closet???!!!! )


=========================


I found this saying last year "In the cookies of life, sisters are the chocolate chips". I modified it slightly to fit this project.


====================


I downloaded copies of pictures and cropped down to similar sizes. Pasted them all together into a word document and then had them laser copied. I cut them into 4.5x4.5 inch pieces and mounted onto primed masonite. (the finished piece is 12 inches x 12 inches). I used my Xyron to adhere the panels to the masonite. I then matted and Xyron'd the focal picture to the piece. Used my new Cricut to cut the flower layers. (Drilled holes into the masonite to fit the hanging rings BEFORE I adhered the pictures). I used picture hanging wire covered with fiber to hang the piece.
==============


Voila!


Here is a close up of one of the hanging rings:


Close ups of the flower corners...... ;)


Comments always welcome. Please leave me your email address so I can get back to you!!


HAPPY HOLIDAYS!!!!!!!!!!!!!!

Thursday, December 11, 2008

Cricut Play!! :)

Some experiments using my new Cricut Create!! ;) I have been having a lot of fun seeing what I can and cannot do with this fun machine. So far I have probably tossed more that I have kept, but I just have to see what works/doesn't work for me!! :)
===================
First, some simple cards. I cut the images from some pretty wallpaper samples that have been sitting in my "storage area" for years. :) A few quick layers and you have some cute cards!!


======================
Ok. Have been trying several Glass Etching experiments. What I have found is that the large, open area image do NOT etch evenly. Very frustrating. Now, if I had actually READ the back of the jar of etching cream, I would have seen that they clearly state: NOT INTENDED FOR LARGE AREAS. Doh! My question for all of you etching gurus.......how in the heck to you get a nice etch on a large area????? (for example, the tree images above, or a pear, or a reindeer, or an ornaments..... etc etc)
Here is my one etched ornament that I did not toss in the trash. I used Alcohol Inks on the back.
=========================
I had fun with these experiments!!! These are cheapo white plates (material seems to be very similar to a Glossy Bathroom Tile) I purchased from a thrift store. I cut my image on sticky back vinyl and placed on the plate. I then mixed up a concoction of StazOn reinker, Blending Solution, and PearlEx in a Mini Mister (a super shrimpy spray bottle) Shook it up and sprayed away. I then blotted the inks with a paper towel and let dry. I pulled of the vinyl and touched up the edges. Not perfect, but I think they turned out pretty cute! I edged with Krylon Leafing pen and then heat set for 20 minutes at 250 degrees.

You can definitely see the PearlEx shine in this plate. I blended Sunflower yellow and Forest green stazon inks to make a brighter green for this plate. I blotted a little more to create some extra texture.
Note on plates:
The plates should only be used for decoration!! The StazOn ink is solvent based and would not be a good combination with food. I have decorated some clear glass plates on the underside with acrylic paints (sealed with polyurathane), and those were food safe (gently handwash)
COMMENTS AND QUESTIONS ALWAYS WELCOME!! PLEASE LEAVE ME YOUR EMAIL ADDRESS SO I HAVE A WAY OF CONTACTING YOU!! :)


Saturday, November 22, 2008

Christmas is in the Air!

My very first Craft Faire! :) It was a very small little faire at our local Curves. It was a lot of fun and I learned a lot from being there. It was a wonderful opportunity to participate in a faire without all of the high pressure of making sales. Here is my little set up. The ornaments did well and I got several compliments on my other art. :)
These are clear glass ornaments that I decorated inside with Mica Powders and Lumiere paints. I attended a demo offered by Jaquard and this was one of the projects we did. Very fun and serendipitous. Love the effect!! :)
UPDATE: HERE ARE GUIDELINES FOR THE TECHNIQUE:
DECORATED CLEAR GLASS ORNAMENTS:
There are several ways to "attack the glass" :) Try with clear and frosted glass ornaments! Look for ornaments with unique and/or unusual shapes.

1) Dribble Alcohol Ink Blending solution into the ornament and then dump in some mica powder (PearlEx, Perfect Pearls, or any Mica Powder.....) and shake around. (Shake quite vigorously, but be careful not to "squeeze too hard"!!)

2) Spray Acrylic Fixative or Spray Glue into the ornament (outside, please!!!) and then dump in the powder and shake around.
Tip for dumping powder into ornaments: USE A TRIANGULAR PALATTE KNIFE!

3) Dribble paint into the glass and shake or swirl around. Allow excess to pour out. Observation, if you get too much paint (too thick a layer) you risk cracking/sloughing when fully dry. Keep your paint layer thin and fill in gaps or thin spots with power. (it makes a very nice combination!)

4) Dribble alcohol ink into the ornament and add powder and shake.

If you have holes or gaps that are not covered, you can try any of the above techniques in combination to fill the ornament. Don't be afraid to toss some fine glitter into the mix for some extra sparkle!! :)


Someone suggested shredding mylar and stuffing it into the ornament as a quick and kid-friendly way to decorate them!!! :)

As always......experiment and HAVE FUN!!!!!!


Here is a close up of some laminate tag sample collages I made. Intended to hang on a tree or display on a mantle. The 2 kid images are from Lisa's Altered Art. Aren't they a hoot?? :)

Tuesday, October 7, 2008

Fred Mullett Classes!!!

Wow! What a fun day!! On Saturday I spent the day in Placerville in class with Fred Mullett! (I left my house at 5:30am and got home at 9:00pm to attend these classes. Know what?! It was worth every hour I had to drive!! :)
----------------------------------
He lead 2 different classes on Saturday: Dancing Rubber Fish and Spritz Me, Baby! If you have not seen any of Fred Mullett's rubber stamps, what are you waiting for??? He has the MOST awesome collection of Nature Print stamps around.....and, they are GORGEOUS!!!! Once you find your way onto his site, check out his tutorials and the inspirational gallery!
-------------------------------------------
Fred is a wonderful teacher and quite the character!! He's probably running on pure adrenaline at this point because this was the last stop of a very busy and hectic teaching circuit.
He was gracious, friendly, helpful, clear and concise in his instructions (I'm sure the sugar rush helped.... we all had access to lots of cookies and candy. Bless the store owner's heart, she offered up pears and apples to try and round out our calorie intake)
The store where I attended class - "Stamp It Rich" in Placerville is one of the best stamping/scrapping stores I have ever been in!! Oodles of product and a super owner that would bend over backwards to help anyone!! If you are ever in the area, stop by!!!
==========
Fred and me!!
Some of my samples from the "Dancing Rubber Fish" class. Try not to notice the "worm" that my fish is trying to eat. That would be "too much pressure" when stamping! :)
The top sample has been "washed" with watercolors, the bottom sample has just come back from being heat embossed. No overlaid watercolors, yet!

Here is my 3rd sample. We chose our own colors for these. Choosing colors is not as easy as you would think!!

Here are some color samples from previous classes and students! Note how some of the color combos really POP!!!!


Here is a sample that Fred made for me with one of his stamps that I own. I LOVE this shrimp!! :) All of the bright color is from red ink and embossing powder! The only watercolor is the yellow and the hint of blue around the legs. Isn't this fabulous!!!!!!!!
Here is a close up for detail...........


Fred taking a "cookie break".


Here are some samples from Spritz Me, Baby! These were done with markers and stamped on plain envies.
Here is a larger sample we did on hot-pressed watercolor paper. I just love this technique!!


Fred setting up to show us the "bleach" technique during the Spritz Me, Baby! class.

Here is my sample from the bleach portion of the class. I really love the dramatic look of this technique. I'll definitely be playing with this one at home!!
Here is an enhanced close up so you can see how dramatic the white ink is over the colored portion against the black paper. Really beautiful!! (albeit, a bit blurry in this pic........sorry!)
If you ever have a chance to take a class with Fred Mullett, don't pass it up! Great fun and a wonderful sense of brain overload!!!! :) :)

Friday, September 26, 2008

Overstamped, Double Saran Wrap, & Watercolors ** A Tutorial!!

Well, hello there!!! I must say it's been too long since I've posted....... I have been spending my free "art" time working on some 4x4 pages for a Fat Technique Book. This is the biggest swap I have EVER been a part of! I'm soooooooooooooooo excited about it!!!! The swap is with the ArtTechniques Yahoo Group.


There are (wait for it!!!.......) 120 participants for this book! WOW!!!!!! We are to make a 4x4 inch "technique" page for the book. Technique sample on the front, instructions on the back. Is that the greatest thing ever??!!!!! We will all have 120 technique samples WITH instructions! Whoopee!!!!!
======================================

I have decided to share my technique here! :)

======================================
REMEMBER: YOU CAN CLICK ON ANY PHOTO TO SEE MORE DETAIL!


Over-Stamped, Double Saran Wrap, and Watercolors


Supply List:
**Water Media (liquid watercolors, diluted dye inks, walnut inks, any commercial or homemade colorwashes, Moon Shadow Ink, Starburst Stains, calligraphy ink, etc)
Small spray bottles (found at Wal*Mart, Target, etc in the travel toiletries section)
**Watercolor Paper
**Saran Wrap or any plastic wrap
**Rubber stamps (or any patterned, textured surface: bubble wrap, textured wallpaper, sequin waste, etc)
**Rubber Gloves


Instructions:
Mix your water media of choice in a spray bottle. (for a little pizzazz, add some Perfect Pearls or other Mica Powder to your paint/ink) Shake well.
Spray a generous layer of water media over your watercolor paper. Make sure it is heavily covered.

===========

You can use a single color:


or, try multiple colors:


Lay a large piece of plastic wrap over the paint/ink and press into the paper. Allow to dry completely.


Gently pull off the plastic wrap and lay down paint/ink side up.

Here is the plastic placed to the side of the paper:


Spray a contrasting color over the plastic wrap. (experiment with heavy spray vs. a light spray over the entire piece)


Close up of sprayed plastic wrap:


Place back on top of watercolor paper and press into the paper.


Allow to dry completely.
Pull off the plastic wrap and throw away. You CAN use your background like this if you like! :)


Here are some other samples I made for the swap prior to being overstamped:


If you would like to do the overstamping:
Spray another contrasting color or complimentary color (experiment!!) over your Rubber stamp (I used an uncut sheet of text stamps from Ma Vinci) or textured surface. Make sure you have complete coverage, but not dripping wet! Press onto your watercolor paper and allow to sit for about 30 seconds.


Close up of sheet of rubber covered with sprayed watercolor:


Pull straight up and allow your paper to completely dry.
Enjoy!!!!!!!!!

Here are some completed samples prior to being cut into 4x4 pieces:


Here are the final 4x4 pieces:


Close ups!: